Showing posts with label video. Show all posts

Sunday, 11 March 2012

Crow walk cycle test V1

I've started attempting to figure out this crow's pesky walk cycle; it's much, much trickier than you'd think...

I was actually pleasantly surprised with the articulation of the puppet — there are of course problems with it, but far fewer than I'd initially anticipated.


The wing tip articulation isn't entirely natural — no matter where I put the anchor point, it rotates in a really odd way, but to be entirely honest it's mostly a limitation with the puppet format in general. There's not really any easy way I could get it to move in a lifelike manner without using multiple layers/shapes for each position. It's not an entirely huge deal — the wing isn't going to need to flex or bend to those extremes during this pose so what we have should suffice.

The other thing to note are the outlines — each section of limb is outlined individually, so when another section is rotated it reveals the outline of the piece underneath it. Again, not a huge deal in this case, but definitely worth bearing in mind when making other puppets. I'll just need to be a bit careful to clean up the outlines, maybe do a few rotation tests in Photoshop first (which is really what I should have done here) before dropping it into After Effects.


Bit of a problem with the head —  the neck isn't quite long enough, so if rotated too far back then we get this weird sort of gap appearing. Luckily a simple fix, and again, I doubt her head will need to go this far back at this stage... However, it may also interfere with the head bob on the walk cycle, so I'll probably need to find a way to correct it. 
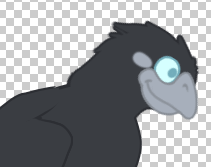

The down rotation isn't too bad — bit of a bump at the back but it's not too much of an issue.

The main thing with the head is that it needs more divisions — the head and the neck should really be separate. This will allow for much looser animation and a better bobbing motion for the head on the walk.


The beak, again, probably isn't going to need to open at this stage, but it's probably worth thinking about fixing it up. I could simply alter the lower beak to include the tongue and inside of the beak, so when it's rotated downwards it will appear to be opening properly.

Enough rambling, on with the animation... 


It's very, very rough at this stage — plenty of problems to dissect! It's quite difficult working from such fuzzy reference — I can't see what the crow's feet are doing on the videos I have, so I'm having to  make some educated guesses. 

The main issues are the timing, I think. Birds, being creatures of flight, are quite awkward and clunky on the ground, so they seem to exert a lot of effort in actually getting their legs up and over. It's quite a slow pick up and they lift their feet quite high to avoid scraping the ground, then really sort of push them forward before dropping them very quickly onto the ground. I think that I need to exaggerate the lift of the leg as it comes up and over, bring the hip much higher and move the wing up to give the impression that the body is tilting away. I'll need to speed up the foot coming down onto the ground — it's more of a 'stamp' and they kind of fall forwards rather than having a graceful descent.

Their hips tend to push forward with the leading leg, so I'll probably change around the rotation of the body slightly and see how it works.

Another puppet problem became apparent as I was animating — the feet need to be divided up more. At the moment, each foot is on one layer, which means I can't get any sort of foot roll as they push the body upwards. I'll need to separate the toes from the base of the foot and have those move independently.

Jazzy's very kindly been shooting some reference footage for me of the local crows, which will help immensely in analysing the walk! I think I'm probably jumping too far ahead — what I might do is try breaking down the walk into key poses, similar to a human cycle — contact and passing positons etc. — and use that as a basis rather than running straight ahead and trying to just copy some footage.

Any other feedback is greatly appreciated! :]

Tuesday, 6 March 2012

Scene 07 V5

This is, in fact, V5 — I just opted not to upload V4. Wasn't too much of a difference, mostly just a sort of in-betweeny stage as we tried to figure out the hang glider timings and whatnot. I'm certainly willing to upload it if anybody thinks it's valuable to do so but for the time being it didn't seem worth using my Vimeo upload allowance on it...!


The crow now runs whilst looking to the right. I just created two separate images of her two-frame run cycle and alternated them for five frames each with some keyframes to give the bobbing/waddling effect.

I also shortened the length of the black/white flashes to one frame each. It's not too much different — barely noticeable, so I don't really think it matters too much which version we opt to use. I did attempt to have an inverted silhouette of the crow against the flashes but it looked a bit peculiar and didn't really 'read' — the image kind of persisted in my vision and, to me, lessened the impact. I'll upload it later on so you can see what it looks like!

Aside from that, not much new. I'll slot this into the animatic and hopefully have a revised version for you all tomorrow.

Animatic scene 07 V3

Afternoon everyone!

Great to have everybody in and working away today. Lovely stuff from all of you! We're making good progress and I'll be typing up a quick recap of everything that was discussed both Monday and today a little later this evening. 'Til then, enjoy this delicious revised animatic scene:


I've basically just animated the crow's run cycle to help us visualise how she might actually run, as well as to help synchronise the scrolling of the background. I've made some attempts to fix up the scarecrow's crash — I corrected the scrolling ground so that it was a little slower to match the bushes. I was having problems with the spinning hang glider and getting the speed of the scarecrow right, so Jazzy suggested removing the spinning and simply having him approach the camera at high speed. I think it works a lot better this way and is much less distracting! She also pointed out that the scarecrow remained in-line with the crow even as the background slowed to a stop, so we now have him moving towards the camera much earlier.

Ron gave us some great advice and suggested preceding the camera shake with a flashing black/white frame effect. He showed us a very clever car crash scene in 101 Dalmatians where a similar technique is used — for a split second the cars flash orange/yellow — a very subtle effect that you don't really see but definitely 'feel.' After the flash occurs in our animatic, we cut straight to the camera shake. I think that the scene is working much better now as a result. The addition of the crow's cute little waddle is ridiculous but (hopefully) quite effective...!

Here's the scene Ron showed to us, if you watch closely you can see the effect:


I've managed to download it and am able to go through it frame-by-frame, which helps to see how it's constructed.


The effect is literally just three frames of flashing colour with a slight camera shake. You'll notice that there is no other indication of the crash — no crumpling bonnets, or anything. In fact it doesn't even appear that the two cars have really impacted at all, but the effect is so fast that it 'reads' very well as a crash. For our version of the effect the flashes each last for two frames, which might be just a little too long. I'm considering cutting them down to one frame each and perhaps even showing a silhouette of the crow in either black or white against a background of the opposite colour (similar to the second image above)? What do you guys think? Do you have any suggestions? :]

The only other thing I'd really like to do with this scene is to have the crow continue her run cycle as she turns to look at the scarecrow. You'll notice that she stops moving her legs/bobbing around when she turns her head — I'll need to separate her head onto a new layer in or simply create a new image with her legs reversed in order to do that, otherwise her head will change direction with the rest of her body. And that will be weird.

Sorry, rambling over. Hope that made sense! GOODNIGHT EVERYBODY.

Alex

Monday, 5 March 2012

Crow flock test V2


 Agh, I've been messing with this all day and I don't seem to be gettting anywhere with it! Been staring at this so long I can't even tell if it looks any different anymore! Having real difficulty getting the timing right. I've tried to increase the delay at the beginning and mix up the birds a bit so they travel at different speeds and move in a slightly less robotic pattern, but I don't know if it looks any better or worse.

I've found that using two flocks of birds is no problem — I can get them to move in an interesting pattern and alter the timings and it looks quite nice, but as soon as I introduce a third flock it's hard to mix it up enough. The third flock will either arrive at the same time as one of the others or slot neatly in between the others, which makes it looks really lifeless if they just neatly arrive one after the other in sequence. I think perhaps I should just use two flocks, but maybe change the position/formation of the birds themselves in the second one to mix it up a little.

Anybody have any suggestions? I'd love to hear any feedback you might have :]

Crow flock test V1

Following on from techniques explored over the past couple of weeks, I put together a test of the flock of crows from the opening shot. It should serve to give us an idea of whether the timing is working, the angle of the birds and the pattern of their flight. It also gives us an idea of how we might go about constructing the rest of the puppets for the animation and any potential issues we might encounter!
 
I was considering how best to approach the construction of the puppet — creating separate wing shapes as experimented with previously would look really nice if pulled off correctly but it might just be too complicated and fiddly to animate convincingly. I came across this video on Youtube of a bird somebody animated in After Effects, using one solid shape for each wing and rotated on a 3D axis to simulate the beating of the wings, very similar to what I did with my first bird test:


It's not terribly realistic, but it got me thinking and I decided to return to a similar technique. Instead of using one solid mass, however, I thought I might try breaking the wing into two separate components — much like we did in Digital Skills, with separate layers for each joint. This would give a degree of flexibility when animating the wings,  allowing me to break and freely rotate the joint to give some delay and overlap to each section.


I drew out a simple wing shape in Photoshop and split it in half, each section on a separate layer, with the connecting sections rounded out to allow for neat rotation at each joint. Then imported it into After Effects as a layered composition and created a hierarchy of parent/child relationships — the wing tip a child of the wing base, the head a child of the body, etc. This meant that if the body or base of a wing was moved, the head or tip would follow, but I would still be able to rotate the tip and head independently.


Once everything was parented up correctly I moved the anchor point of each limb so that it would rotate from the joint rather than the centre. I then just keyframed a basic up and down motion of the base of each wing, giving me a very static but distinct 'flapping' motion.


You can already start to see problems with the puppet at this point. The base of the wing sticks out when the tip is rotated, and the base has a really sharp edge that sticks out of the body when the wing rotates downwards. All totally fixable, though!

To loosen things up a bit I then added a little delay/overlap to the tips of the wings, so that they would drag behind as the base of the wing travelled down, and continued forward when the rest of the wing was being pulled up. I also added a little rotation to the body and head, as well as a slight jerk to the body caused by the beginning of the flap, the force of the movement pushing the body upwards.

I also turned on the motion blur switch at this point, just to smooth things out a little.

I did also have a little poke around in After Effects' curve/graph editor, applying what I'd learned about function curves in Digital Skills 2, just to give a slight overshoot to the wings as they reach the top of the movement. It was far trickier than I thought. The curves don't behave entirely as you'd expect (sometimes, when you drag slope handles, absolutely nothing happens!)


 I don't know if I'm just not used to it or if it's genuinely less intuitive. It has a separate graph for speed and value of keyframes which was massively confusing and just seems needlessly complicated. The top graph is the Value curve, and the bottom is the speed graph. If you look closely towards the last keyframe on the top graph, you can see that the curve extends very slightly above the keyframe. It's this that gives it the overshoot — the wing travels a little higher, then slowly comes back into the pose defined on the keyframe.

The speed graph is a little trickier to read but it's the same principle. I'm not entirely comfortable with how it works — I need to read into it a little more — but basically, the vertical axis represents an increase or decrease in speed (represented by high and low points on the curve, respectively) and the horizontal axis represents the 'influence,' controlled by bezier handles. The 'influence' basically controls  how quickly the object reaches the speed indicated on the graph — much like Softimage, the wider the curve, the slower the acceleration.


To reach the graph editor (if you dare!) simply click on the parameter whose speed you want to alter and click on the weird graph-y icon thing next to the giant stopwatch/keyframe button. The graph editor will open up in the timeline panel, displaying either the speed or value graphs.


To change which graph you're looking at, just right click and choose 'Edit Speed' or 'Edit Value,' depending on which you want to alter.

Anywho! As a result of all that tinkering, this is what I eventually ended up with:


It looks just as bad as my first attempt did at this point, but experience has taught me that once it's actually composited and put together it (hopefully!) will look much better. Fingers crossed.

It looks too quick to me — I think that the wings should probably delay slightly at the lowest point before beginning the upstroke and vice versa. The body movement is off as well. It looks like it comes up too soon, before the wings have even started beating, so that needs to be shifted a bit — probably just as the wings come down, or after they hit the mid-point? The motion blur does seem to disguise the dodgy rotation sticky-out bits, though. To some extent.

Being just a test, I didn't go all-out trying to make it perfect and gorgeous, so I just dropped it straight into a new composition.  I used the same techniques to put it all together as I did before, assembling multiple birds into one composition and adjusting their start positions so that they didn't all flap in perfect sync. Using the animatic timing as reference, I simply keyframed the scale and position parameters to fly them across the screen and towards the camera. I duplicated the flock layer a couple of times and slightly shifted the start/end points to create a larger flock.


One of the flocks originates from the wrong point and I think they need to spend longer on the horizon at the beginning of their approach. It's quite a distance they're covering so, realistically, they need to spend a bit more time as mere dots, gradually getting bigger and then increasing in speed as they draw nearer.

For the purposes of a test, though, I think it's alright. It's given me some ideas, highlighted some issues and should hopefully aid us in the composition of the rest of the shot!

Friday, 2 March 2012

Animatic V2 & V3

Hey everyone!

We've pretty much finished amending the animatic now, so have a little gander:


Massive apologies for the quality of the second scene (with the zooming on the barn door) — I didn't seem to have a copy of the scene file so had to rip it from the Vimeo version and resize it accordingly. I'll replace it with a higher-quality clip on Monday.

Unfortunately, our amendments have increased the length of the animation considerably and it now clocks in at almost 2 minutes. A lot of it is simply backdrop animation, so I don't think it's unachievable, but I do think we need to seriously consider where we might be able to cut back on some of the scenes.

I did another version very quickly, cutting out the first shot of the crow walking through the cornfield looking for the scarecrow. I think it still works reasonably well without it and it manages to cut back the time to around 1:45.


Personally, I feel that most of the timings are pretty much fine now, but there are still a couple of things that are tweakable — I don't know about anybody else, but I think that the transition between the outside and inside of the barn is a bit off? I think it's because the pan across the inside of the barn is a lot quicker than the zoom on the doors. We might need to look at either speeding up the zoom or slowing down the pan (at least for the beginning part)? Looking at it again, I think that the scene transitions a bit fast — I'll perhaps try holding the zoom just a bit longer before it fades. Does anybody else have any suggestions? :]

The other thing is the zoom on the blueprint — this is probably just me being a little pernickity, but I kinda feel that could be just a tad slower?

Tuesday, 21 February 2012

After Effects flock of birds test

This post is quite long... sorry about that!

One of the earliest things mentioned whilst we were developing the script was the potential difficulty in animating the opening scene where the flock of crows overhead towards the camera. I'd had a few ideas on how this could be achieved relatively simply using After Effects and decided to put together a small test to better get an idea as to how it could potentially be done.

I took a lot of inspiration from the above video, in which the author claims the birds were created using a random particle generator system (presumably in some 3D software such as Maya) — this is a bit beyond my scope, but looking at it set me on the right track.

I thought that if we were to create a simple flying cycle of one bird, we could simply duplicate it multiple times and offset the position/beating of the wings so that the birds fly at different speeds, creating a fairly realistic impression of a flock of birds in flight. We could then simply keyframe the position/scale of the birds so that they appear to fly towards the screen. I put together a really simple animation to test the idea.


It's not terribly realistic but in terms of testing the process I think it worked pretty well. Obviously the composition and perspective are very different to what we want, but we could quite easily apply these techniques to the opening scene.


To start with I just knocked together a very crude bird puppet in Photoshop — made very simply of two layers, the wing and the body (opacity lowered so I could see what I was doing). I imported the transparent PSD into a new After Effects composition and set the anchor point of the wing layer to the base of the wing.


I then converted both the bird's body and the wing into 3D layers so that I was able to rotate the wing down on the X axis to create a simple flight cycle. I set three keyframes on the wing: one with the rotation set to +45, the second at +135 (downward position), and a third at +45 (back to the starting position.


I also keyframed the position of the bird's body so that it rose up and down slightly as the wings beat.  Enabling the wing layer's motion blur switch which helped to soften the animation slightly, giving the wings a subtle blur as they move up and down.


I know, I know, it looks AWFUL. But stay with me on this one!


The next thing to do was to get the animation to loop continuously so our birds will flap across the sky. I could have simply repeated the keyframes to achieve the same effect, but if I wanted to lengthen the clip I would have to keep duplicating the keyframe. Setting the animation to loop using an expression ensured that I could shrink or lengthen the clip as much as I liked without effecting the loop.

I used a simple "loopOut" expression. By holding alt and clicking on the stopwatch of any parameter you can apply an expression — a bit of code that allows far greater control over those particular keyframes. In this instance, the expression loopOut(type = "cycle") basically means "at the end of this animation, go back to the beginning and play it again!"

I then created a new composition (called "bird_flock") and placed my single bird animation into it. I scaled down the bird composition to around 12% - 20% so that it would fit within the sky of the chosen backdrop. I then applied a simple "wiggle position" effect with a speed of 1 and a radius of 30 pixels. This would give the birds a little more randomness in their movement and ensure that they didn't move in perfect sync, which would have made their movements a little too robotic.


I then duplicated the original bird a whole bunch of times and shrank/scattered them randomly around the canvas in a vaguely flock-like fashion. At this point, aside from random wiggling, the birds were flapping their wings in perfect synchrony which looked a bit odd. Repositioning each layer in the timeline slightly offset the animation and started each bird's wings at slightly different positions. The result:


I then dropped the birds onto another new composition containing a generic field image I nabbed off Google. I keyframed it panning slowly to the left over the course of about 12 seconds. That's not really important, but the point is that the birds need to fly a little faster than the speed of the background.


I shrank the birds down even further and dragged them to the far right of the canvas. I then set the last keyframe at the 5 second mark and dragged the birds all the way to the left so that they would appear to fly across the screen.


To make the birds blend a little more with the background, I used a "Tint" to give them a very subtle blue-grey hue which fit in a bit better against the sky. I also gave them a slight gaussian blur effect to slightly shift them out of focus so they wouldn't look so harsh against the sky.


The final thing was to make the flock a little larger with another set of birds that moved at a slightly different speed. I duplicated the original flock layer and moved it in front of and slightly down from the original flock's position. I also activated the 3D layer switch and pushed it "back" along the Z axis so it appeared a little smaller/further away.


Then, like before, I offset the animation on the timeline and dragged the last keyframe a little further along the timeline. The resulting effect is that the first flock slightly overtakes the new flock in the air and reaches the other side of the screen slightly before.

Final result again:


It's crude and not terribly realistic, but as a result of half an hour in After Effects and Photoshop it certainly doesn't look too bad. If we spend longer creating a nicer flight cycle and are really careful with the keyframes, I think we could get a great result fairly easily!

I'm sorry for the massive post. I'll shut up and go away now!

Storyboard animatic


Quick and dirty, but it's in sequence and gives us a vague idea as to the scope and timescale of the project, as well as helping Jae to "visualise" (audialise?!) the sound. The timings are terribly off in places and it isn't necessarily an accurate representation of the actual timings. It's very difficult to try to balance the timing and feel of the original with trying to keep the panels "readable" on-screen.

Sorry about the dodgy fades/effects — had a number of problems with Premiere Pro that I was simply not able to solve — problem with the preferences file which, for some baroque reason, prevented the timeline from being played back. I'll probably go back and re-tweak things a little later on (no doubt it will annoy me otherwise), but it should give you an idea of the general flow.

Wednesday, 15 February 2012

Animation reference - "Scarecrow"


As promised, here's one of the videos that I thought might be quite nice as reference. Take a good look at the backgrounds - visually stunning and the lineless style contrasts really nicely with the main characters. Perhaps we could look at creating something similar (but slightly more simplified)?

The fact that the story's about a scarecrow is an added bonus. :P

Remember — we'd like to see you all blogging away into the sunset!

Alex