Following my last post, here's the result of a little playing around in Photoshop, trying to figure out how to construct the crow puppet for maximum animation potential.
All the pieces (including each section of the wing) are on separate layers, so we can twist and tweak in pretty much all directions as necessary and hopefully get some really nice personality out of it.
Few things I'm not too sure about — I kinda think the outline on the beak/feet could stand to be a little darker? I'm not too sure on the eye colour either... is it too light? Would you prefer a different colour or shade of pupil?
I'm also not sure how she'll animate, but I'm hoping to test her tomorrow morning and see how it works.
I'm now going to go ridiculously in-depth into how I built the damn thing, so I apologise for being so wordy, but I hope it might be helpful in some way!
I started by roughly sketching out the basic pose for the puppet — I'll be working over the top of this and neatening it up with pen tool shapes to give a crisp outline!
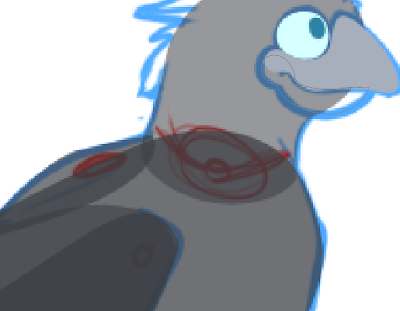
Once the sketch had been neatened, I used the reference videos to consider which body parts would need to be moveable in order to create convincing movement. I marked each joint with a small circle to give me a better idea of where certain pieces should overlap for the anchor points to be placed. The head and legs are, of course, essential — I also decided it would be nice if the tail and wings were moveable so that we can get some nice bird-like flicks and twitches!
I made the sketch blue (so it would be easier to see the pen tool lines) and started roughly tracing the outline of each shape for the limbs on a separate layer, making sure to encompass each marked joint to allow for smooth rotation. I'm really glad for the body structure research I did beforehand — though I'm far from an anatomical expert on birds, knowing roughly how they're built made it much easier to decide which shapes should be on which layer!
Not much else to say at this stage — I just carried on making and filling shapes on separate layers with the pen tool. I dropped the transparency of each layer for clarity, so I could see how each section was overlapping.
I outlined the head without the hair first, just so I could get a solid underlying structure and make sure that it made sense before adding detail. I decided to do the face independently — this way, if we need to open or close the beak it'll be a smooth opening with no weird gaps in the head.
The beak was a bit tricky — I decided to do the top and bottom halves as separate layers, using the cheek/side of mouth as a sort of hinge. I think that it'll be the bottom half of the beak that moves most, simply because rotating the top beak too much will look a bit weird. It seems as if it's directly attached to her face and moving it around too much wouldn't make a lot of sense — plus it would intersect the head like some sort of weird phantom beak.
The rough outline was mostly complete at this point, but I did a little more tweaking with the hair at the back of the head — the bottom-most spike looks a bit like a weird squashed sausage so I wanted to fix that a bit.
The rear leg was created by simply duplicating the original, shifting it up and to the right and dropping it below the body layers. I then simply gave each section a colour overlay of a slightly darker hue.
It was at this point I started wondering how best to do the outline. Applying a stroke to each layer would outline literally everything, including all of the separate pieces making up the wings and feet, which would look really peculiar. Instead, I decided to give each section an outline on a separate layer. I made selections of each limb — wings, body, head, beak, etc — expanded the selection by 2 and smoothed by 2 pixels. I then created a new layer below all of the solid colours and filled with a darker shade of that colour. It sounds really weird, but having the outline on a brand new layer meant I was free to erase and tweak sections of it as necessary — you see in the image below how the 'shoulder' of the wing is outlined inside of the body. I was able to simply erase this without effecting the rest of the puppet.
And the final product again...
Feedback and criticism is always welcome! :]


No comments:
Post a Comment